|
by
David Barron
There
comes a time when everyone who builds a model railroad needs a special
tunnel portal, stone viaduct, cut stone bridge support, or pillar to
support a structure, and the darn thing just isn't available in the
commercial market -- at any price. Most railroaders will
needlessly give up the special idea and settle for something secondary,
like cutting an existing tunnel portal, usually with weird results, or
modifying the "perfect" scene to eliminate the problem. The
answer to this situation is to sit down and design, or copy from
pictures, that perfect idea you had! It's a lot simpler
than most people have been led to believe; if I can do it, so can you.
Your tools, can be found around the house and with a little imagination,
and some plaster, you are on your way. Now let's get started.
Tools
The minimum tools that
you need for this project are listed below. These same tools are
used when you put scenery on your layout, so if you don't have them
now, you will sooner or later.
-
A
stainless steel straight edge, like a 6" metal ruler.
-
An
old toothbrush, preferably one you are finished with in the
bathroom.
-
A
couple of X-Acto knifes with #11 blades, old dull ones will do.
If you are like most model railroaders, you're a packrat and have
saved up a bunch of them.
-
Some
sort of a pick, like a spring steel wire poked into the end of
a wooden dowel with the exposed end sharpened into a point.
This is to get those stubborn plaster pieces out.
-
A
comfortable chair, located in a place where itty-bitty plaster
chunks can fly around without the spouse raising an eyebrow at your
mess.
-
Safety
glasses to protect your eyes from those itty-bitty plaster chunks
flying around. You have no idea how much plaster stings in the
eye until one of those chunks lands there.
-
A
bunch of large straight pins for holding the mold together while we
are pouring plaster into it.
-
Some
smooth (beaded type) sided Styrofoam, the best kind has the metal
foil on one side.
-
A
bottle of Mountains in Minutes green latex mold making goop,
and some gauze and sticks to help stiffen up the mold.
-
Some
strips of aluminum sheet metal the same width as the thickness of
your Styrofoam.
-
Your
favorite plaster.
Getting Started
Obviously, you have
some special situation or you wouldn't even be considering this
project. Let's say that you need a special tunnel portal that
you want to make, that will duplicate one you fell in love with from
some where else. First of all, study the picture of it and look for the
hidden details like relief, brick or stone surfaces, wood, keystones,
how the material was bonded together. Look at its height, width,
and approximate thickness. Once you have developed a mental
picture and a plan, make a sketch of it approximately the same size that
you want it to be. Make all your improvements on the paper
now because once the plaster is poured you'll be in duck soup -- well maybe
wet plaster.
Dam the Thing
Since you have decided
on what the exterior size will be you can take the Styrofoam and
start making the dams so the plaster doesn't end up all over the
floor. Cut a piece of Styrofoam about a foot square to be the
base. If you're working in a larger scale, you may have to cut out
a larger base. Next, cut some strips of Styrofoam about an inch
wide but the thickness of your portal or project. You can now form
a square the same size as the proposed portal exterior size. Use
the straight pins to poke through the Styrofoam strips to hold them in
place. How do we get the arch? The aluminum sheet metal is
bent to the arch design that we want, and the legs are trimmed to the
proper height and secured with a straight pin, on both sides of the
sheet metal, inside the square with the
leg ends firmly against the edge. A good source of sheet metal is a
soft drink can, watch the edges as they are sharp after you cut them
with a scissors
Pouring the Plaster, etc.
Mix your favorite
plaster, with or without coloring, and pour it into the cavity you have
just produced, up to the top of the mold. To drive out the bubbles, tap
the edges of the mold base for a minute or two. After the plaster
starts to firm up, not harden but just firm, where it will not run off
the base, take the pins out and carefully remove the dams.
Carefully remove the arch as well. Your rough formed master should
hold its shape now and soon will be ready for carving.
Carving
Carefully draw your
straight edge over the plaster face, several times, shaving the surface so
it is perfectly smooth and flat. Put on safety glasses if you
have not already done so. Take your drawing and place it on the
surface. Take a pin and poke small guide lines along the drawing
to transfer the image to the plaster surface. Take a knife or straight edge and carve
out the relief. Use the pick you made to get out any stubborn
chunks. To cut courses of brick use the straight edge and draw the
#11 blade along the length of the brick pattern. I like to use the
backside of the blade to do this, not the sharp edge. After you're
happy with these lines, take the knife and cut individual bricks
or cut stone by alternately cutting vertical lines connecting the
parallel lines. If you are doing brick, make sure the individual
brick lines follow up the face by using your straight edge again. Cut
stone is not as critical. You can freehand field stone by just
making several non-repeating patterns. Now comes the best step of
all. Reach over and get that old toothbrush. Use the
toothbrush to clean out the lines by firmly brushing both directions on
brick and all directions on random stone. The longer you leave the
plaster set the sharper the edges will be.
This will not only clean the lines you just cut, but round the edges a
little. On brick you will want to brush one way, but not too hard as
you want the edges to stay nice and sharp. You might want to even
delay this cleaning until the plaster firms up more. On
random fieldstone, I found that firmly brushing in all directions make the
random stone more round and accents the space between the stones.
Don't forget to give some of the individual stones some relief as
well. If
you're doing a non-concrete arch, you will need to put in a course of
stone or brick with a Keystone at the top. This locks the unit
together in real life and is a necessary detail. You can freehand cut
this course of brick and the keystone.
When you are happy
with the looks of this project, put it aside to fully harden and dry.
This will be your master, so treat it with tender loving care unless you
want to make another one.
Reproduction
Now this is a touchy
subject in most families, so I'll keep it brief! OK, so my jokes
are a little lame!
I use Mountains in
Minutes green latex mold compound and gauze. After the master
is thoroughly dry, I start by force brushing this green goop into all of the
cracks and crevices that I have so carefully carved into my master.
I let it dry and repeat the process several times. After the basic
details are fully filled with mold material, I layer on a thick coating
of green goop and add gauze. The gauze is twofold; it helps
strengthen the mold and keeps it from tearing. I add in several
alternately placed layers of gauze running in different directions.
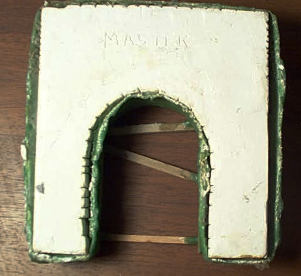
If I am building a rather large mold like a portal, I will stiffen up the outside edges by putting wooden strips into the mold and
even bridging between the legs with longer wooden strips (see Figure 1). The Mountains
in Minutes will turn dark green when it is fully dry.
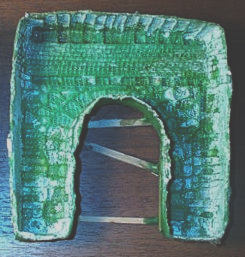
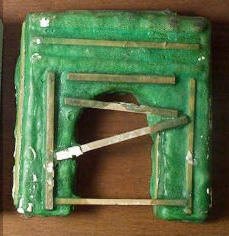
Figure
1. Reinforced mold -- interior and exterior.
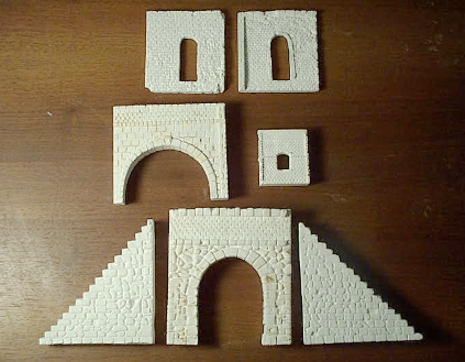
After it is fully dry,
carefully work the mold off the master and then carefully clean the
leftover plaster pieces out of the mold with a brush and water.
Your mold is finished and ready for reproduction of your master (see
Figure 2)!
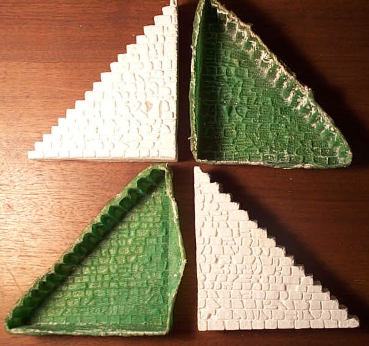
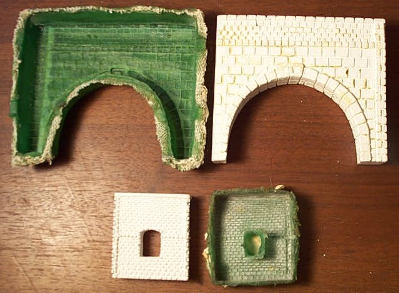
Figure
2. Masters and molds.
Duplication
I like to use a flat
surface for my mold to sit on when pouring plaster. I use a flat board that
is bigger than my mold and place the mold in the center (see Figure 3). One thing
to watch for when pouring duplicates is for the mold to have unsupported edges,
as they will sometimes bow out. You
can eliminate that by using sand to support the outside edges of your mold
while pouring. Simply put sand all the way around your mold almost
to the top edge of the mold.
Figure
3. Pouring into a mold.
Next, coat the inside
of the mold with a mold release. I use a concentration of soapy
water to coat the inside of the mold and apply it with a brush, and I have seen others use cooking
PAM with the same results. In any case, you want a mold release.
Mix your favorite plaster again and pour it in. Gently tap the
edges to drive out the bubbles and let it harden. Once it is hard,
plop the duplicate out of the mold and let it dry. Check it over
and if it is satisfactory, paint it with
your favorite paints and install it on your layout. Now you have
something to impress your modeling buddies
Mold and Master Storage
Sooner or later, your
mold will grow old and lose its detail. You can make another one
if your master is still in good shape. By putting the master back
in the mold when you are done making castings, you will protect the
master and the mold from damage during storage. If treated right
they will last for years.
Good luck and
have fun.
Click
ARTICLES to read other techniques for model railroading. |