|
by
David Barron
One
of the easiest techniques to make your model railroad look larger than
it really is would be to use forced perspective. In order to do
this, we must think of what and how we are actually viewing nature. When we look out across any space, we see objects that seem to get
smaller as the distance increases. We also see
sky, trees, and in some cases, hills or even mountains. When we
model nature, we must force these items to gain the perspective of those great distances. This is done using forced
perspective.
Let's
first talk about the sky. A sky during a clear day is many colors
of blue, depending on the amount of moisture, dust, smog, and dirt in the
air. For simplicity sake, I have found that a color called Velvet
Sky-Vinyl Acrylic flat house paint best matches the sky.
I first paint the entire backdrop with this color and let it dry (using
a roller).
This provides a good base to start painting backdrops.
If you paint the entire wall up to the ceiling, you
should add clouds to get the best
overall effect. There are three different
types of cloud families -- cumulus, cirrus, and status. We are most familiar with the low level cumulus or puffy clouds that give
us the summertime showers. Let's talk about the way we actually
see these clouds. As a child, we painted clouds by using white
paint; remember how they looked a little strange? That's
because we painted them like they were receiving light equally from all sides. The sun plays an important role in the way clouds look
and act. As the atmosphere heats up, it also rises and as it lifts,
it carries moisture upward. As this moisture cools, it condenses
and forms clouds. That's why you will see most clouds with a
flat base -- that's the altitude where the moisture condenses, or becomes
saturated. The upward movement of the air is what makes the clouds
keep growing up to altitudes that exceed 40,000 feet above sea level.
Let's get back to our fair weather, puffy little clouds. To paint
these, you will need a minimum of three colors -- velvet sky blue,
titanium white, and either neutral or Payne's Gray. A good stiff
fan type paintbrush that you can stipple (jab paint) with, not a soft brush, is best.
First, determine where the
sun is supposed to be in your room, and paint the
whitest portions of the clouds in that direction. The darkest sections of the clouds
will be on the opposite and bottom side of the cloud from your imaginary
sun. When painting the clouds, don't start making the same
patterns, leave them irregular and different sizes. Go outside and
look at clouds. See how they puff up at different points but tend
to grow from the center? If you are painting the wall, start at a
position about 20 degrees above your normal eye level (as you look at the
layout), and jab paint where you want a cloud. Remember
that the cloud will be irregular at the top, but mostly flat across the
bottom. Paint the top edges and about half way down into the
cloud with the titanium white.
Next, mix up some of the gray and
white, about 50/50. Jab paint this on the bottom and side away
from the sun. Again, keep it irregular. Blend it into the
white with light jabs at the meeting points. This will make it look like puffs on your side of the
cloud. Now, mix up some of the straight gray and even up the bottom
of the cloud and farthest section of the clouds (from the sun).
Walla, a cloud!
Sometimes
clouds have rain in them.
Before they rain, they get real dark nearest the bottom as the water
vapor blocks out the sunlight. The bottom also starts to become
irregular as the vertical winds start to come down with the rain.
On my western layout, I have a single cloud with this rain depicted as
virga, rain that evaporates back into the atmosphere before it hits the
ground. It is isolated, and I have a single environmental sound
tape that has a thunderstorm in the distance to help create
the illusion. Someday, I plan to add a strobe light behind the
wall, using an old throw away Kodak camera, and small holes in the wall,
to simulate lighting in the clouds.
The
Paint
Under
the clouds, we have land, hills, and mountains. Our farthest
mountains should have a blue or gray tint that is caused by moisture and
dust in the air. Mountains are irregular and have no real pattern,
they tend to overlap, as we see them, and with the sun in mind again we
can put shadows on them. Paint the vanishing point about eye level
and position the mountains about 10 degrees above that. As the
mountains get closer, they start changing to a light green, and finally
to the darkest colors into the foreground. The closest greens
behind our forests should be the darkest and almost a blackish green.
This would depict a dense forest and the associated shadows. This
gives us a good base to put our foreground forest up against (see Figure
1).
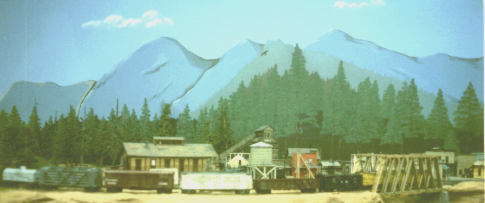
Figure
1. Painting mountains and trees.
To
paint foreground pine trees, I use a roofer or carpenters square and a
couple of different styles of brushes. I start out by determining
what I want to depict. Some of the trees on my layout are only an
inch tall, while others are nearly 22 inches tall. The shorter ones
are in the distance and are of the regular Christmas tree style, and the taller ones are close up redwood trees. I started out by
painting the blackish green background trees as a form only, with
everything the same color. Only the tops of the trees are
depicted. Next, paint all the trunks in place with various shades
of brown, raw sienna with various mixes of black added. I use a
square as a rule and guide to assure that the trees will be straight up
and down. All the trunks are started at the bottom and worked
upward to a decreasing diameter point. Remember that the bottoms
of the trees just don't go straight into the ground; they tend to
spread out, kind of like us humans! Add bark and protrusions with
lines of dry brushed black, gray, and white highlights. Next, add
branches like a ladder on both sides of the tree, evenly decreasing in
length until within a few branches of the top. Next, lightly
highlight the sun lit side with dry brushed white and gray on both the
trunk and the tops of some branches.
Now comes the best
part -- adding all the little pine needles to the branches (see Figure
2). With a single
hairbrush; no, not really! With two colors, Hookers Green and
Chromium Oxide, you can paint all the branches. Lightly jab paint
or fan brush trying to leave some of the branches that you previously
painted still visible. Lightly jab or fan brush the paint right
over the brush. I first paint the Hookers Green and then put the
lighter Chromium Oxide over the tops of the Hookers Green branch paint
like the sun is shining on it. Next, you can highlight above the
Chromium Oxide with white, mixed with the oxide, slowly building up the
branches with the lightest shades on top of each brow. Vary this
treatment over all the trees, not on each and every tree. I was
able to paint three 20-foot walls with this technique in less than a
week, start to finish.
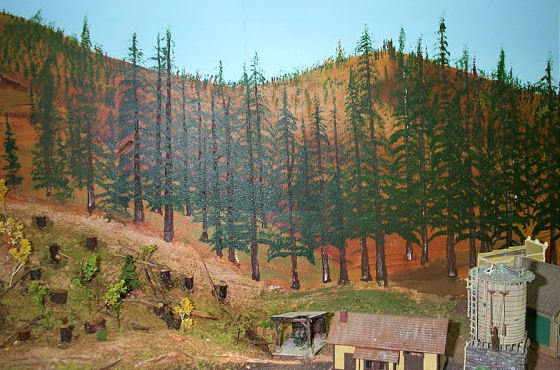
Figure
2. Close-up trees.
There
are many ways to force perspective. Perhaps the easiest way is to
start decreasing the size of man-made objects, so they appear to get
further away from us. Many model railroaders, in one scale, will
use a smaller scale structures in the most distant sections of their
railroad to force perspective. This helps the illusion of greater
distance by fooling the eye. What do we do if we are limited in
the distance we have to work with, say 24 to 36 inches?
Obviously, even a three-dimension structure is going to be difficult to
force perspective. We want to run our trains, so they have
priority on the layout over structures. Why not use flats of
structures on the wall or back drop behind where the trains run? I found color pictures in railroad magazines, took them down to a
commercial color copier, and had reduced color copies made. Then,
I cut them out and glued them to the walls as part of my
backdrops. These
copies were around three dollars a print, which is cheaper than building
a structure. Take a black pencil and
darken the paper edges after cutting the copies, and the edges will
not show. After the basic backdrop is painted you can attach these
cutouts in place with white glue. You will have an instant town or
structure on the wall in forced perspective. Now, blend it into
the foreground scenery by using a couple of trees painted on the cutout
or add three dimensional trees and structures in front of it.
These background structures will look better than you ever imagined.
If
you are not happy with your results, remember you can repaint the
wall blue and start over. I guarantee you will get better with
each try. Good luck and have fun painting!
Click
ARTICLES to read other techniques for model railroading. |