|
HOME
Cedar Shingles
Figures
Forest Turf
Logcar Kits
Model Fences
Natural Stumps
Plating Service
Power Lines
Sawmill Wood
Scale Glass
Sound Cams
Weathering
Shipping
Product List
Brass Sales
RR Gallery
RR Articles
RR Links |
|
by
David Barron
When I was
growing up in the upper Midwest, I remember very clearly visiting my
grandfather's farm in Grays Lake, Illinois. I was told prior to
his death that he was not only a farmer but also a J. I. Case Equipment
dealer. He had a very large three-story barn where he kept his tractors
and equipment. His business was known as Barron Implement.
As I grew up, I remember the unusual vertical rods on top of his barn
and other wooden yard structures. One day I asked my father what
they were for, and he told me the following story.
First, he
said that when he was a young boy, the glass balls on the rods were
targets for his .22 caliber rifle -- until he got caught! My
father emphasized that his father got rather angry for shooting the
balls off his lightning rods! Gee, I wonder why? He then told me that
the rods were part of a lightning protection system which was installed
on the buildings to protect them from lightning damage, mainly fire.
When I asked about the glass balls, he said that they were indicators
that a lightning rod had been hit by lightning. The rod would
super heat and cause the glass ball to shatter, thus becoming an
indicator of a strike and to check the system for damage. These colored
glass balls were
not merely ornamental, but a vital element in the protection system.
These systems had always intrigued me and in my early modeling years, I
installed them on the roofs of my scale structures. In some NMRA contests
and in a few published pictures, I have seen these rods installed on
other models, some of them properly and others improperly. In an effort to
get the best information available about lightning rods, I contacted one
of the leaders in the field, Mr. Douglas J. Franklin, Vice President
(and descendent of Benjamin Franklin), Thompson Lightning Protection,
Inc., of St. Paul, Minnesota. Mr. Franklin provided all the
diagrams from his catalog. I also consulted my local Internet
service and did a search for more information.
First of all,
let's discuss a little about lightning. Lightning is a short lived,
high current electrical discharge in the atmosphere, which can occur
between clouds, cloud to air, and in its most destructive mode, cloud to
ground. Lightning is responsible for millions of dollars worth of
damage every year to both forests and civilized areas, just in the
United States! It is further responsible for between 200 to 500
deaths per year, just in the United States. Basically what happens
is that buildups of negatively charged free electrons exist in the
atmosphere. Their invisible release along a specific path, known
as stepped leaders, occurs when a discharge takes place near a cloud
base. The negatively charged step leader works downward to a point
approximately 150 feet or less above the ground where another stepped
leader from the ground, a building, tree, or other protruding objects,
reaches up to meet it. At that point, when the two leaders meet,
the visible lightning is produced. Several strokes of lightning
can occur along this path until the charge center as the base of the
cloud has dissipated. The thunder that we hear is really a shock
wave caused from the intense and explosive heating and expansion of the
air along the discharge path.
During the
1700's, Benjamin Franklin was doing his famous "fly the kite in the
storm experiments." By 1749, he had suggested the use of
lightning protection equipment in the form of metal rods for building
and other structures. Ben's theory was that if a metal rod was
placed at the highest point on the structure and grounded by a low
resistance cable, lightning would strike the rod and pass harmlessly
along the system and into the ground. Ben went on to say that a
rod's area of protection was equal to a cone-shaped area with its base
equal to the height of the rod itself. |
|
| Well,
now that we know a little about lightning, how do we model a protection
system on our scale buildings?
Several different applications
can be used -- from just cutting off the head of a straight pin
and sticking it into the apex of roofs to a full fledged model of a
lightning protection system. I suggest using a K& S .020 solid
brass rod and super gluing either Clover House #39 or
Sierra Scale
Models #120 white or colored insulators (glass beads) midway on the rod
or air terminal. Figure 1 shows a copper or aluminum class 1 air
terminal with threaded mounting pin. This will provide
several very realistic rods for less than a penny. |
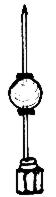
Figure
1. Rod w/insulator. |
|
| Several
different rod designs are offered from the Thompson Lightning
Protection, Inc. All of these designs, some as old as the turn of
the century, have some form of grounding cable attachment points.
A sample is shown in Figure 2. Some designs are for flat
structures, some for peaked roofs; others are for stacks and chimneys.
Grounding cables can be simulated using waxed thread, wire, or
monofilament line. Connect all rods together and continue down to
and attach to a copper ground rod. The standard grounding rod is
anywhere from 1/2 inch to 3/4 inch in diameter and up to twelve feet
long. I suggest using the K&S brass rod for this. |
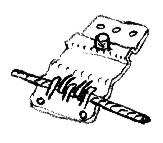
Figure 2.
Mounting base. |
|
|
| The
glass balls were used exclusively up to the 1940's. After that,
plastic balls became common, and few manufacturers continued producing
the glass balls. Some of the balls were hand blown, as the
Polar Star (Figure 3), which dates back to 1916. They were
five inches in diameter and fit a 5/8" lightning rod. They came
in transparent amber, opaque blue, transparent green, transparent red,
and opaque white. |
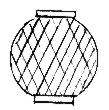
Figure
3. Polar star. |
|
|
| Today,
an increased demand for glass balls has resulted in complete new
designs. Thompson offers these new glass products in transparent
amber, transparent blue, transparent dark green, transparent ruby red,
and opaque white. Now, the balls come in two hemispheres and are
plastic, which are put
together face to face on the rods. The two halves can be of
different colors, resulting in an infinite number of color
possibilities. The plastic balls are set together, (Figure 4 illustrates a skyline plastic ball with ribbed
style). |
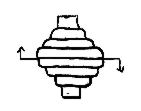
Figure
4.Skyline plastic balls. |
|
|
| They
are made of a tough weather-resistant and fade-resistant styrene plastic
and are almost indestructible -- purely decoration. They come in
many colors also -- sky-blue, transparent red, golden yellow, silver
gray, transparent green, and snow-white. The
glass balls were held in place on the lightning rod with a ball support
ring, plastic balls fitting tightly over the rods. That ring is really
nothing more than a thick metal washer device, with setscrews to tighten
them down on the rod. Then, a special hold down washer is used to
prevent the balls from blowing off the lightning rods. A note
should be made that at no time were holes drilled in the rods or pins
installed for this application because heating and cooling could cause
the pins to become loose. Then, they would fall out causing the
indicator balls to fall and break. A good simulation of these
support rings and hold down washers can be made by cutting a short
section of insulation from an insulate wire and putting it above and
below the glass bead.
By now if you
have followed this article and studied the drawings, you have become an
"expert" in the lightning and model lightning protection
field. Since you know the dangers of not protecting your structures,
you should either add these items or show some structures with lightning
damage! You could start a new industry on your pike for selling
lightning protection equipment or have some men either repairing or
installing a new system on one of your buildings.
Source
|
Click
ARTICLES to read other techniques for model railroading. |
|
|