|
by
David Barron
Many
model railroaders have selected early western North
America railroad operations to model. This period is viewed by
many as a time when the greatest railroad growth took place, and it is
full of romance of the rails, both for standard and narrow gauge.
Period railroading allows for variables from small logging to massive
mainline operations. If we look at how we date our model railroad,
we find that figures, vehicles, rolling stock, motive power, and
structures place our miniature worlds in the time we have selected.
Basically, scenery and track right-of-way remain the same now as they
were in the past. How well we model each of the above named
elements dictates how well we succeed in our attempts at period
modeling. A good source of information is contained in many modeling
magazines. A free index for the magazines is located at
http://index.mrmag.com/ .
Each
of the elements noted in the previous paragraph have changed over the
years through improved technology. Since most of us are trying to model
historical times, we must resort to resource
material, structured kits, or design criteria to satisfactorily depict
our models. In the following article, we will look
at the design criteria of early western structures, their different
elements, and how to put them successfully together to enhance your
modeling skills.
As
we examine early western structure design, we will discover several distinct, but at times, overlooked
features. Foremost, it must be remembered that almost all building
materials were locally available, e.g., wood, stone, sod, etc. Any
other materials, including glass, nails, iron straps, hardware, paint,
and some bricks, and miscellaneous parts either had to be made locally
from raw materials or shipped in from somewhere else. Most
structures were unique, to fit the purpose they were designed for with
little thought given to ascetics. About the only attempt to
add design character to early structures was ethnic influence from the
builder's past. This article focuses on some of these general design details used in early,
1870 - 1913, western structures.
Thoughts on Design Criteria
When
thinking of the period you want to depict, the best resource materials
you can use, if you are not totally familiar with the area or time
period, are books, photographs, or drawings. To determine
structure sizes in the photographs, try to select something of a known size
in each photograph for comparison. Certain elements or
characteristics become common when you study early western structures.
The structures were small, and most were made of wood construction.
Paint, if used, was very subdued and only on surfaces that would show.
Except for rare exceptions, all building were unique and nothing was
grandiose or gaudy.
When
designing a structure, or reducing a prototype to a more reasonable
size, you must remember the period of time and local setting for the
structure. Obviously, you don't want a
towering 20 story brick and steel structure in the middle of a small,
rural mountainside community. Incompatible scale or large
structures just don't fit well with small single business structures.
In the same frame of mind, incompatible forms do not fit well together
-- for example, a small wooden false front structure and a large orange reception
stand, a steel oil derrick, or even a large concrete grain mill.
You want everything you put in your period depiction to look good
together and accent each other.
Placement of the Structure
Unlike
the real world, most modelers tend to over-exaggerate almost everything
on their railroads. This, depending on how it is done, can be good
or bad when trying to force perspective in a limited area. Where
else, in less than a scale mile, can we find some of the most changing
natural features that seem to defy the laws of Mother Nature.
When
determining the location of a new structure, depicted as new or
old, we must think about the ground it is to rest upon. If
you want to build a town on a hill, you may have to simulate a
grade or flatten the area. Did
the early builders do this? In most cases, no. They had better
things to do, like survive. Of course, you can build a foundation
to help level the building as well. The early builders looked for
natural areas that were somewhat level to begin with. This is why
most towns were built in the valleys, rather than the sides of mountains
or hills. Unavoidable cuts or fills should blend with the
surrounding terrain contours. If you do grade out an area,
be sure to put the simulated fill someplace close by.
Proper
drainage is important to remember. At the very least, it should be
properly depicted even though it rarely rains on our scale worlds.
Control of water flow was very important to avoid mobile
structures. Remember, rainfall varied yearly from
almost nothing up to 70 inches or more.
Orientation
of structures was important to early builders in the snow regions.
Snow always lingers longer on the north side of anything, including
structures. Some new structures were also orientated with this regard,;
to the north or to prevailing winds. Do you know
where north is on your layout? If you don't know, you can always
check for scale moss on the north side of your scale rocks!
Proper use of Building Materials
Several
manufacturers produced a multitude of building materials. Selecting
the proper materials and using them correctly is essential in properly
depicting your chosen structure. When selecting siding or roofing
materials, make sure you use them properly.
Board and batten material obviously is always vertical, and clapboard is
always horizontal. Other appropriate siding patterns have unique
applications. If you want something unusual, think -- would they
have done this or is it practical? If the answer is no, then it
probably wouldn't be a good model, and it would stand out like a sore thumb.
If you're trying to build a structure as it would have been built in its
early life, don't mix building styles. Don't try to combine historical styles into a
plan that visually doesn't make sense. In other words, keep with
one style. One other caution, when building kits make sure you get
the parts, castings, and siding in the proper or logical positions, and
right side up! This may sound silly, but as a former NMRA judge, I
have seen missing elements of a depicted detail and some even attached
upside down, like windows, concrete platform supports, and even lighting
rods. I've also seen buildings with a chimney going up one side
of the structure and the top of the chimney on the other side, a good
trick in real life! A great source of metal detail castings is
Smokey Mountain Miniatures. They are inexpensive, and have adequate
detail when painted.
Characteristics
Early
builders took advantage of local material, rocks in New England, adobe
mud in the southwest, and wood where it was plentiful. Where the
weather was severe and cold, the structures were generally small and
economical to keep warm. A roof was always steep in snow regions,
for obvious reasons, with pitches of 8:12 at a minimum. Porches
were used as shelters from the summer sun, wet rains, and winter snows.
During
the period of 1870 to 1913, structures were built to a modest size.
The height of a single story structure would have been about 15 feet,
with a maximum height of 22 feet and a minimum of 14 feet. Two story structures were generally about 30 foot, with 25 being minimum
and 35 foot the maximum height (see Figure 1). Three or more floor
levels in structures were very rare in the early days of the west.
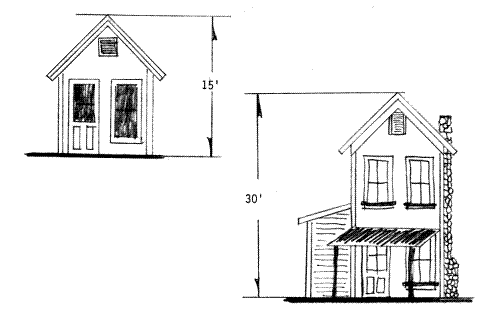
Figure
1. Building heights.
The
character of any model town can be very effectively created with
structure features on each building. These structures generally
should be depicted as practical, sedate, and sober, yet can contain the
flash of scallops, fishscale shingles, trim boards, and other
decorative designs, (see Figure 2).
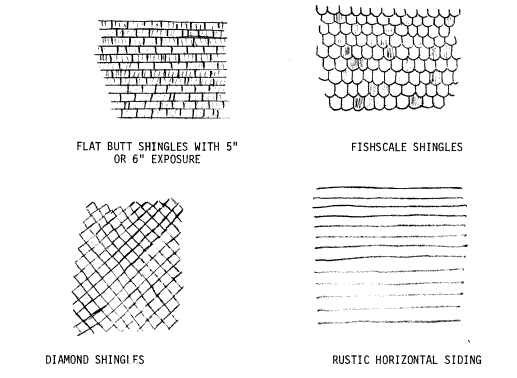
Figure
2. Shingles and siding.
Regional
influence affected the architecture of any town. In the early days,
everything was hand made. The Swedes, Italians, Irish, Oriental,
Southerners, and Yankees brought their influence to the west.
Certain designs were indicative to each group.
False Fronts
False
fronts were typical of the early western structures.
Their earliest application was to the front of large tents, and then to
structures that had four walls and a canvas roof. In almost
every case, a false front wall was extended as a facade alluded to the
size, finish, and importance of the building. They contained
character, expression, and the spirit of the builders. Most false
fronts also served as signboards and became a place to decorate with
fancy work of one kind or another. Not too may folks were fooled by
the false fronts, but almost all were enjoyed.
Roof Styles, Slopes, Siding, and
Shingles
The
old saying goes, "beauty is in the eye of the beholder.' Appeal for older structures can be influenced good and bad by your
choice of the correct or incorrect architectural elements.
Early
western structures were generally more vertical than horizontal.
The roofs were steep for various reasons. Windows were generally
tall and narrow. Simple style with minimum ornamentation was put
into early structures. It is the successful combination
of proportions, structural elements, such as windows and doors, and the
correct detail that will assure a pleasing building.
Windows
in the early period were generally very small because flat glass had to
be hauled in. The windows were made up of multi-glass panels such
as 12 panes 4 high, 8 panes 4 high, 12 panes 4 high, or 4 panes 2 high
variety, (see Figure 3). Several manufactures of scale windows do an
excellent job at producing these. Grandt Line is my personal
favorite. Screens were rarely used, but when they were, they were
typically in wooden frames that were temporarily put into open windows.
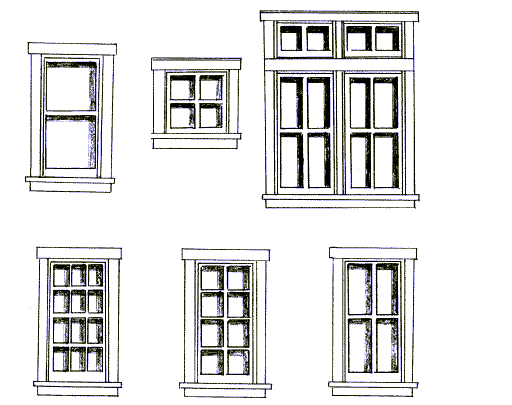
Figure
3. Windows.
Doors were also treated as details and followed good general patterns.
They varied from the rough saw cut doors made of boards to finished
ornate doors on bank buildings. They included styles with and
without glass. Commercial building doors were rarely plain.
If a solid door was called for, it usually had 4 panels arranged on the
door. Other doors had wood panels on the lower portion and various
glass windows in the upper portion. Large commercial structures
had double door entries. Again Grandt Line is my
favorite source for these door castings.
Glass
can be depicted in several ways in models. You can use clear
flat plastic, a clear liquid that dries, or use real glass.
Personally, I prefer the real glass, as nothing looks better than glass
when depicting the real thing. Sierra Scale Models sells scale
glass and a sizing tool. I have successfully put glass
in structures, passenger cars, and even steam engines.
Sod
was used on the roofs of very early structures, mostly due
to no wood for shingles being available. If wood was
available, wooden shingles
were good choices for siding materials since they were good looking,
practical, a good insulator, shed the rain, and in most cases, locally
available, after the shingle mill was built! Shingle patterns
varied as well as their application. In
fact, cedar shingles were often combined with other types of
siding. In most all cases, when buildings were shingled on the
sides, the use of 5 corner boards were always recommended.
Two styles of application are depicted in (see Figure 4).
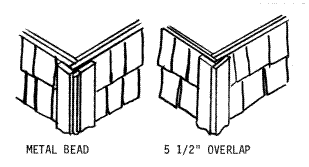
Figure
4. Corner boards.
Figure
2 shows some of the more common applications of cedar shingles, fish
scale, diamond, and flat butt shingles. I prefer the thin real cedar
sheets for cutting shingles and individually gluing them in place.
The effect cannot be duplicated. Another source of shingle
material is the Campbell's Rolls of gummed paper shingles on a roll.
These come with a lined cardstock sub roof, which is handy for the
beginner to use. Combinations of more than one style together can
be used and be realistic or even combined with rustic horizontal siding.
Other forms of siding and/or foundations did exist, which have lasted
throughout time. Brick patterns used in banks or other
substantially built structures had their patterns as well. Two of
the most typical styles used were the common bond, which was
acceptable for low walls, small foundations, planter, and some
structures. The row locking common bond style with
bricks on every 6th row or course were used as a row locking technique
for all structures. Of course, in most areas brick was
impractical to obtain so natural stone was randomly laid for foundations
and walls, (see Figure 5). In some foundations or structures, you may
want to use stacked cut stone.
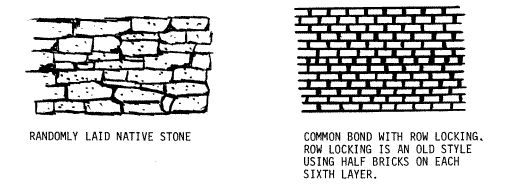
Figure
5. Stone and brick patterns.
Roof Styles and Slopes
Basically
three roof styles, or combinations of them, can be used to typify 90% of
all early western structures. These were the gable roof, hip roof,
and shed roof, (see Figure 6). The slope or steepness of these style
roofs was important for various reasons. A flat roof would
allow an accumulation of snow and weight, which, needless to say,
resulted in a less than satisfactory situation. Too steep of a roof
was impractical. Slopes of roofs are commonly expressed in terms
such as 6:12, 8:12, 10:12, or 12:12. What that means is that for
every 12 inches of horizontal run, the rise is 6, 8, 10, or
12 inches. Older style structures usually had
steeper roof slopes than those built today. Roof slopes of 8:12 or
more were typical.
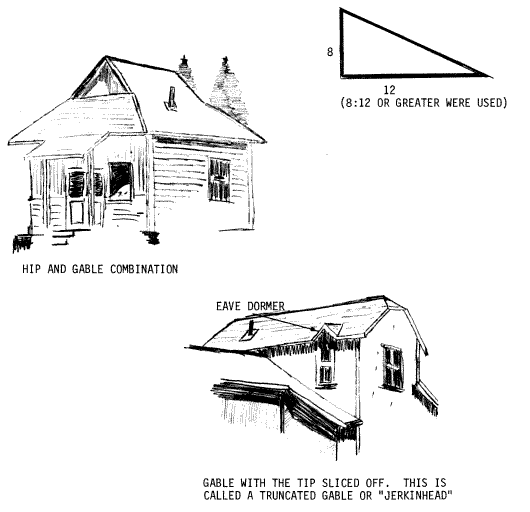
Figure
6. Roof styles and slopes.
Combinations
of roof styles and materials were common. The main structure could
be roofed with cedar shingles and have a roof shed or standing seam
metal roof attached next to it. Another roof feature that adds
variety and interest is an eve dormer. This is a break in the
normal roof near its edge to allow a high window or opening to be
installed with clear unobstructed view or access. Combinations of
a hip and gable roof may add interest to any model and shows that little
additional attention getter that separates it from a run-of-the-mill
structure and makes it a superior one. Other variations include a
gable that could have the end sliced off, commonly called a truncated
gable or jerkin head. Typical combined roof styles are
depicted in Figure 6.
Now
that we have talked about roof designs, let's talk about the different
type of roofing materials. Several types of materials are
appropriate for early western structures. Most of these materials
have been used through present day applications. The materials
include the cedar wood shake shingles, standing seam sheet metal,
corrugated sheet metal (see Figure 7). Again, Campbells makes corrugated sheet
metal in different sizes. Tarpaper roofing
can be simulated using tissue paper or with model airplane
silk span wing covering cut into small pieces -- the size of rolled
paper. Builders in Scale, now C.C. Crow,
makes some very good standing seam sheet metal roofing materials.
Other excellent examples of these types of roofing materials are
available on the commercial market.
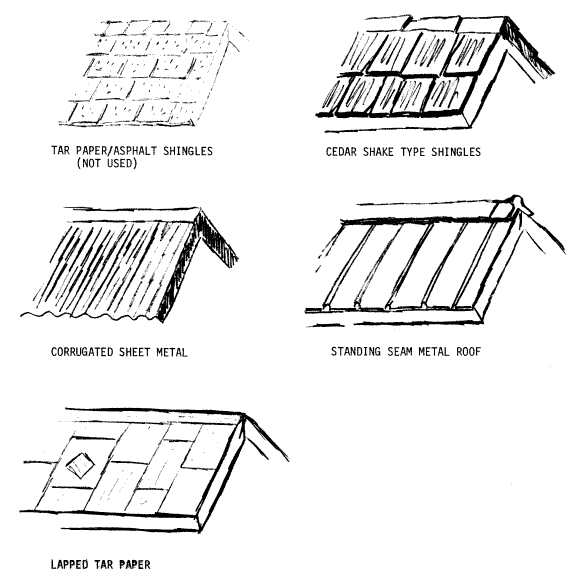
Figure
7. Roof coverings.
Posts, Brackets and Gable Details
The
character of a building can be enhanced greatly with the use of simple
ornamentation without losing the flavor of the old west simplicity.
Both posts and porch details were used and were appropriate for the 1870
to 1913 and beyond era. Roof gables and details, as can be noted
on the D&RGW stations, were used.
Most
wooden porch supports, that had detailing, were at minimum chamfered
with a 45-degree angle, others may have had brackets dressing either
side of the upper post or may have even had double posts (see Figure 8).
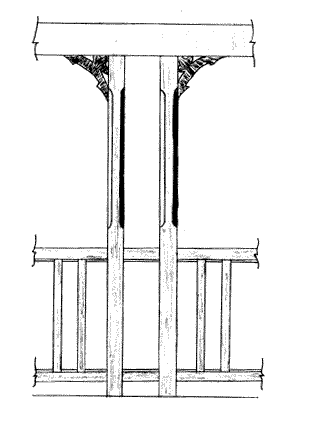
Figure
8. Gate
Roof Vents, Roof Ventilators, Chimneys,
and Stove Pipes
Roof
ventilators or monitors were used in some early structures. These
provided an exit for hot air buildups and added character to some
structures. These roof ventilators or monitors resembled a pigeon
coup on the roof ridge and should not be confused with attic vents or
gable end vents. The attic vents were not roof mounted, but were
located on the vertical side of the building, usually high and under the
protected end of a roof gable.
Chimneys,
built of stone and brick, as well as metal stove pipes were located on
the building as need existed. Current building codes put
restrictions on the type, location, and use of stovepipes. Back in
the old days, owners pretty much put them everywhere, sometimes
with devastating results. Chimneys were built out of native stone
and were located both internally and along the sides of structures.
Site Detailing
No
matter how well a person builds a structure, it will look naked without
having the proper and appropriate detailing that would naturally
surround it. These details take on a multitude of forms
appropriate to each type of structure. Some of the core common
details noted in western structures include windmills, outhouses, sheds,
hitching posts or rails, flagpoles, benches, wooden barrels, crates, and
water troughs. These items were not just junk items cast aside;
they were necessary and functioning details.
Fencing Styles of the Period
Wooden
fences were typical of the period in the west and were made of stone,
woven wire, and even wood -- provided it was plentiful. Corrugated
metal was rarely ever used, but if it was, it usually come from unusable
roofing materials. Fencing styles and variations in (see Figure 9)
were probably the most typically used.

Figure
9. Fencing styles.
Another
type of fencing used were the so called porch railings, these were
almost always made of wood, although some were cast iron and, depending
on the importance of the structure and took on several unique designs.
The drawings in Figure 10 offer only a small sampling of what was
actually used.
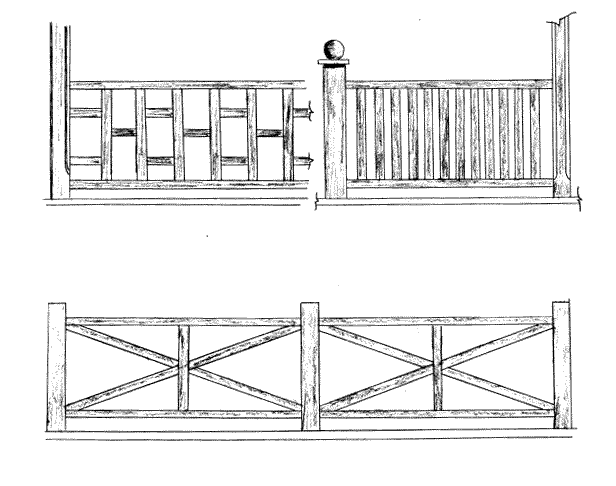
Figure
10. Fences and gates.
Outdoor Lighting
Nothing
enhances the looks of a structure better than the proper installation of
scale lighting. Master Creations has done wonders in the
application of computer driven lights and sound in their SE kits.
If you ever get a chance to see these, it will turn your head.
Several other commercial manufacturers make excellent outdoor light
castings, which are perfectly acceptable for most structures. These
fixture castings are obviously generic and can usually be improved upon.
It was not uncommon to have a special or unique light
associated with a building of importance. In most cases, the local
blacksmith made these lamps, and they more than often required extensive
tinkering to keep them in operating condition. The lights could be
on a free stand, mounted directly to the building, or hanging from a
chain. Both acetylene and kerosene were used in the early days,
followed by natural gas and later electricity to light up the area at
night. In real important buildings, such as banks, hotels, and
fancy bordellos, the light lens carried the name or initials of the
associated structure. Figure 11 shows an example of one of these
lights.
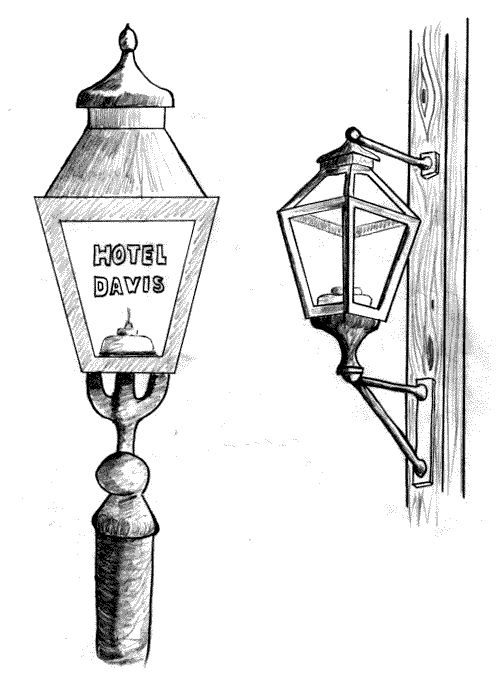
Figure
11. Lamp lighting.
Finishing Touches
As
a town started to mature past its initial conception, certain
civilized touches started to appear. These
improvements included latticework under the porches, canopies over
storefronts, weather vanes, water troughs, and hitching rails.
Other items that should be considered when planning a structure include
bird houses, planters, and even the honorable outhouse, (see
Figure 12). Temporary items such as flagpoles, brackets, benches,
wooden trash barrels, boxes, and ground trash should always be
considered appropriate for a scene.
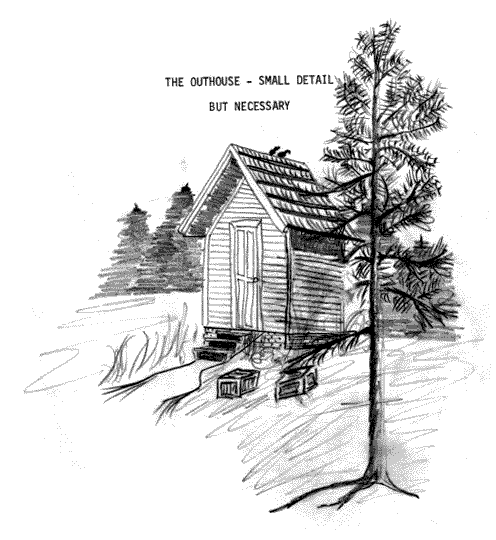
Figure
12. Outhouse.
Signs of the Times
Excellent
decal and dry transfer signs are available for several sources,
including Woodland Scenic, SSLtd, Micro-Scale Decals, and many others.
These come in color and several fancy, curved and pictorial designs.
If you decide that none of these fit your application, then the following
information should be remembered. The nature of almost all western
signs was simplicity, practicality, and being forthright. In
checking actual photographs of the period you are trying to depict, you
will find very similar styles of lettering. In most cases, New
York Roman or railroad Roman lettering was used. Picture
signs were not used as much in the early days as they were after 1900.
Product and/or picture signs are noted as being usually small and
painted on their own backing, which was then attached to the structures.
Business names and/or General Merchandise signs were painted
directly on the false fronts of structures in usually black and white
letters, depending on the contrasting background. Small signs were
attached to porch posts, under windows, or even painted, at times,
crudely, directly on windows.
Weathering
Depending
on how you want to depict a structure, weathering comes into the
picture. Even a newly built structure will have dust accumulation
on it, which can be applied with several different mediums -- chalk and
weathering fluids as an example. The sun will, in time, bleach out
the red colors and lighten wood to a soft silver gray look. It also
shrinks
and cracks the wood as it dries out. A fantastic natural wood
weathering fluid is a product by called Weather-it, which will take
new modeling wood and age it with a soft silver gray look.
Everyone should have a bottle of this around. Mold and other wet
rot will make the wood appear darker near the ground. Replacement
boards will be of a different color than the original wood. A new
coat of paint may not match the old color, which has bleached out in the
sun. Faded or pealing paint can be depicted on structures depicted
as needing work. Use your imagination or check books for
accurate weathering depictions. Use common sense. A
structure does not weather evenly; covered areas not exposed to the sun
do not weather as rapidly as exposed areas. Remember, also, that
most structures were painted only on the front or street sides.
The other sides were left exposed as raw wood and were never painted.
Painting varied and was almost always very subdued. Garish colors
were used to attract the less than desirable crowds -- the painted
ladies, saloons, and other establishments of questionable repute.
Conclusion
The
best source of material covering the multitude of period western
structures will come from photographs and other documents that are
available today in books, back issues of railroad and other magazines,
and the public library. Another
great source of data is books, --Colorado Rail Annuals from the Colorado
Rail Museum. If you are up to a field trip, you should visit
Silverton, Ouray, and South Park City, Colorado. South Park City
has gathered and restored original buildings with full interiors and all
the stuff that went in the buildings! This is a living museum, so
take your camera and lots of film. Another superior book for
details is called, Ghost Towns of the West by William Carter.
If you have specific questions and need more data on a particular
project, contact your NMRA A.C. Kalmbach Memorial Library in
Chattanooga, TN. Each NMRA member has several hours of
research time available each year at no additional charge. If you
want to build an outstanding structure, make sure that you follow the
same design and construction techniques that were used during the period
you are attempting to duplicate. By doing research before you get
started on a structure, you will learn more and do better contest
worthy modeling. Your additional efforts will show in your
model and make it a superior replica.
Click
ARTICLES to read other techniques for model railroading. |