|
by
David Barron
Many model railroaders
want their scale structures to have the most realistic roof covering
that they can. Because of the high visibility of roofs on layouts
are a primary focal point.
Many early structures had roofs covered with wooden shingles
because they were inexpensive, easy to apply, and did a fairly good job.
The two biggest enemies of wooden shingles were rot and fire.
In our scale structures, we really don�t have to worry about
either. In about 99% of the
available commercial kits, that range in price from almost nothing to
several hundred dollars, the manufacturer supplies an old and, if
installed without some special treatments, very unrealistic, roll of
brown paper shingles. In other aspects,
kit builders have made great strides in ultra realism, from the
quality of metal, plastic, and plaster castings, to finishes and laser
cut woods. Yet, modelers
are expected to allow the roofs on structures (that we spend weeks and
sometimes months to build) to retain the color and texture of a brown
paper grocery bag. Is that
what you really want? If
you are willing to put the time into a difficult and expensive kit, then
you probably want the best looking roof available.
After all, your roofs are perhaps the largest area that you and
your friends see of your buildings after they are installed on your
layout. Let's make some
adjustments.
First let's look at a
prototype-shingled roof. If
the shingles are made of cedar wood, they are probably redwood, although
that is pretty expensive these days.
These shingles vary in color, width, length, and thickness.
Above all, they have a wood grain texture.
This is what we are trying to simulate.
So what do we do to simulate all of this?
Richard H. Christ wrote an article in the 1969
Model
Railroader Magazine, which addressed the idea of using
individual cedar shingles for roofs.
In this article, Mr. Christ pointed out the source of these thin
cedar sheets as wraps used around a 15-cent cigar.
Well, the cigar has gone up in price and the wrap has pretty much
disappeared from the market since then.
Sierra Scale Models is one of a very few companies that can now
provide you with the thin, .012 thick cedar sheets (see Figure 1).
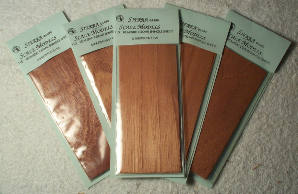
Figure
1. Cedar shingles from Sierra Scale
Models #110.
Now, let's talk- about
using this product. The
first step is to cut the sheets, with the grain direction, into widths
ranging from a scale six to twelve inches wide.
Once you get all the strips cut, either on a paper cutter or with
a straight edge and model knife, it's time to cut the shingles to
length. Look at a scale
rule and see what sixteen to eighteen inches, in your scale, looks like.
Next, pick up a group of the strips and, with a pair of scissors,
just start cutting off shingles, across the grain, to length.
Don�t worry if all the cuts are not perfectly square.
That only adds to the realism during the application process. This job really isn�t as hard as it sounds.
Once you have a pile
of these scale mini-shingles it's time to prepare the roof for them. Most of us have already used the lined cardstock to put our
paper shingles on. If not,
these lines can be drawn on the brown card stock that comes on the back
of most tablets of paper. The
pencil lines are drawn horizontally across the roof about nine scale
inches apart; this allows the proper overlap of the shingles when
applied. After these lines
are drawn, and the roof is installed on our structure, spread a thin
film of white glue along the lowest two parallel lines.
Using a sharp modeling knife, stick a mini-shingle, and place it
so the grain runs vertical to the roof, starting at a corner of the roof
with about a 30% overhang off of the roof.
It helps if you have a dull pencil in your other hand to hold the
shingle down as you retract the blade point from the shingle.
Finish this row across the bottom of the roof by putting each
shingle in place next to the previous one.
Keep the top edge even, and don�t worry about the
unevenness of the bottom edge, as this will only add realism to the
roof. Next, smear another
film line of glue across and do the next row, only with the top edge
about nine to twelve scale inches higher and overlapping the previous
row. Keep your rows
parallel, using the previously drawn lines, and finish all rows all the
way to the top.
Finish all sides the
same. When you get to the
top you can do several things to top out the shingle roof.
Three ideas include:
-
A cap of stripwood shingles glued, overlapping along the peak set 90% to the
shingled roof.
-
Build a fire
walk out of stripwood to hide the peak; be sure to add fir
barrels.
-
To simulate a
lead cap peak, use tin foil cut a scale 12 inches wide, the length
of the roof, and glued in place.
If you want to get
fancy, you can add a piece of mechanical pencil lead glued along the
peak on top of the thin foil. Once this all dries you can paint the simulated lead cap with
a color like Floquil Gun Metal.
As far as the finishing on the shingles, you have several
choices. You can hurry up
the aging process with A-West Weather-It, which gives a soft weathered
appearance associated with sun bleached shingles (see Figure 2).
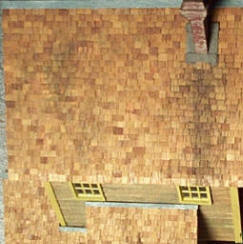
Figure
2. Model building with cedar shingles.
If you desire a more northeastern look where the shingles pick up
a little darkness from the mold, you can try the India ink and alcohol
process. Mix it thin and
allow it to dry between coats. Stop when it looks appealing to your eye.
You can stain the shingles darker around the smoke stacks with
shades of paint or chalks. You can even add small specks of white bird droppings to them
near the peaks or where birds would congregate overhead.
Be sure to weather some of the dropping with thinner, and dry
brush others using small streaks of weathered white down the roof.
After all they didn�t get there all at once unless elephants
learned to fly!
If you're putting
shingles on cone type roofs, then you will start out with a normal
size shingle and work progressively to the peak with smaller shingles.
If you are puzzled about a particular application either go out
and look at the real thing or get some of those expensive books and
magazines you have been accumulating and check out old pictures of
roofs.
Cedar shingles
have been used on numerous prize-winning models at NMRA contests for
years. Richard H. Christ, in 1968, won a �Best of Show� at the
fall Sunshine Regional meet using them.
I have done the same at similar contests.
Remember nothing looks more like wood than wood itself.
Now you have the knowledge on how to make contest winning roofs
of wooden shingles.
Click
ARTICLES to read other techniques for model railroading. |